Hi-end Extreme

Tuesday, March 16, 2010

PC-K62R1

Mid Tower Chassis


"Quality" is always the essence of Lancool's products, All products are manufactured in Taiwan by Lian-Li and distributed to worldwide markets.


The DragonLoad K serires builds LanCool’s high standard of Quality requirement. This SECC steel cases features a red interior with completely tool-less design are the perfect complement to a PC gamer’s needs, Use the 0.8mm SECC steel panel and high quality plastic, DragonLoad K serires is your best choise all over the market.


LanCool redesigned the internal layout for a better thermal solution, Dragon Load K62R1 uses large size cooling fans to remove the system heat faster and quieter as well as keeps the system more stable.


The cutting edge tool-less design is an important key feature in 2009 LanCool cases. LanCool designer considered end user requirements, like those who need to build systems faster, or swap out components often. The brand new tool-less modules can make users’ life much more convenient.


The idea of LanCool K serires's is from DragonLoad, design by modem way ,


The hardware installation with Dragon Load K62R1 is very easy and simple. The front panel and top panel are detachable and they can be removed without tools.


The Dragon Load K62R1 is targeted for the LAN party gamers. It is a mid-tower case, which is ideal for the latest graphics cards in combination with the best thermal dynamics. All the internal installation can be done without tools, and is easily adjustable to optimize your hardware setup. Especially in the advent of adding in new graphics cards, equipped with 8 PCI slots, can hold three or more graphics cards, supports CrossfireX™ and 3-way SLI™.


The new internal layout has the motherboard on top of the power supply unit, which allows for easier access to the motherboard as well as more room above, thus larger CPU coolers can be used. The power supply unit at the button of the case is cooled with fresh cool air directly from the outside of the case, instead of pre-heated air from within. This will bring down the core temperatures and extend the lifespan of the PSU significantly.


To install motherboard require no tools, use tool-less screw to screw a motherboard on case, easily and quickly.


The Dragon Load K62R1 is equipped with large cooling fans, with low RPM, which still provide enough air flow to cool down the hardware adequately. The front 140mm intakes red LED fan runs . The top two silent 140mm fans exhaust the hot air out, and the rear 120mm red LED fan extracts the hot air out.


The fans on the top panel are mounted with Lian Li’s new anti-vibration fan mounting system; the rubber ring grommet absorbs the vibration, keeping the case silent.


The new 5.25” bay tool-less mounting incorporates a mounting bar equipped with rubber padding. After secure the mounting bar, the rubber pad pushes and holds the 5.25” device in position to secure and absorb vibration from the device.


The too-less HDD cage combines with patented anti-vibration rubber grommets to suspend the HDD’s in a noise free environment. The two buckls on both side to hold the HDD in position, also absorb and reduce vibrations.


The aluminum PCI tool-less mounting module is equipped with a rubber pad which can hold the graphics card firmly while closing the gap found in the PCI bracket and PCI slot to reduce noise from escaping air and furthermore reduce vibrations.


The Power Supply has rubber pads for both insulation and support. The mounting clip is also aligned with rubber to reduce vibrations but also and also secure the PSU without scratching the painted surface.

There are�special air intake vents at the front of the case, allow cold air to enter , also keep system noise inside the case.

There are four rubber grommets between the HDD cage and HDD, avoid HDD directly contact the HDD cage, absorb and reduce vibrations, keep the noise down.


Dragon Load K62R1 inputs cold air by the 140mm red LED intake fan, There are also vents on the 5.25” bezels, allow cold air to enter the case to cool the system down.


The two 140mm fans on the top cover and the 120mm red LED fan at the rear exhaust the hot air out from the system. The fans cover the whole motherboard, and they can remove the heat fast.


The rear 120mm red LED exhaust fan just next to the CPU, it can remove the hot air out fast and silently.


There are vents on the PCI slots, provids extra cooling to graphics card.


The power supply unit is at the bottom of the case. It can draw in cold air directly through the vent below the power supply unit. This cooler, fresh air will keep your PSU components more cool and stable and thus extend the PSU lifecycle.


Dragon Load K62R1 supports liquid cooling system, the two holes at the rear of the case allows water tubes to pass through, and the rubber cover can protect the tubes away from cutting.


The Dragon Load K62R1 feature a high density vent design, to make sure fans remove the system hot air out of the case totally.


Fan speed controller for adjust fan speed from 800-1180RPM. User can choose the fan speed to get the best cooling or silent performance.


2009 has seen an all-new tool-less design from Dragon Load K series chassis. To do this required a great many innovative patents to be filed worldwide. The ideas will make installing and maintenance much easier. For example when installing the 5.25” optical drive, just slide the drive into the 5.25” bay, and close the mounting bar to secure the optical drive, as simple as that.


The installation of the hard disk is very easy, and tool-less. Place the hard disk into the aluminum cage, and fasten the bucks to secure the hard disk.(2.5" HDD install feasible), Slide the hard disk within the cage into the special hard disk rack with the rubber suspension grommet.


To install PCI add-on cards require no tools at all. Simply open the aluminum arm of the tool-less PCI add-on card holder, insert the add-on card to the motherboard slots, and close the aluminum arm to hold the add-on card in position. The additional rubber padding on the aluminum arm assists in gripping the card bracket and securing it firmly.


To install PSU require no tools. Simply open the aluminum PSU holder, insert the PSU in position, also can turn PSU's fans up or down to suit your need, then close the aluminum PSU holder.


The fans on the top panel are mounted with special screws with rubber ring suspension grommets. These allow easy access and removal of the fan for cleaning or service.


There is an air filter at the base of the case to stop dust from entering the case. The filter is washable. The vents are specially designed to retard heat and fire crossover should a short circuit cause sparks and excessive heat within your system. This feature is designed to prevent the problem from spreading outside your case should the unlikely event occur with your components.

The intake fans are aligned with inlet holes on the bezels. These are equipped with air filters to stop the dust and keep the internals dust free and clean.

Credit : www.lancoolpc.com

Thursday, March 4, 2010

WD VELOCIRAPTOR


WD VELOCIRAPTOR


Overview

Fastest SATA hard drive

on the planet
SATA 6 Gb/s interface and 32 MB cache enhance the next generation 10,000 RPM WD VelociRaptor making it up to 15% faster than the award-winning previous generation.

Monstrous capacity

WD VelociRaptor SATA drives are available in capacities up to 600 GB, double the capacity of the previous generation.

Rock-solid reliability

Designed and manufactured to mission-critical enterprise-class standards to provide enterprise reliability to high duty cycle environments. With 1.4 million hours MTBF, these drives have the highest available reliability rating on a high capacity SATA drive.

Features

Fastest SATA hard drive on the planet
SATA 6 Gb/s interface and 32 MB cache enhance the next generation 10,000 RPM WD VelociRaptor making it up to 15% faster than the award-winning previous generation.

Monstrous capacity
WD VelociRaptor SATA drives are available in capacities up to 600 GB, double the capacity of the previous generation.
Rock-solid reliability
Designed and manufactured to mission-critical enterprise-class standards to provide enterprise reliability to high duty cycle environments. With 1.4 million hours MTBF, these drives have the highest available reliability rating on a high capacity SATA drive.


Ultra-cool operation
Consumes less idle power and uses similar active power as the previous generation WD VelociRaptor, while offering double the capacity and higher performance.

IcePack mounting frame
The 2.5-inch WD VelociRaptor is enclosed in a backplane-ready enterprise-class mounting frame with a built-in heat sink that keeps this powerful little drive extra cool when installed in high-performance desktop chassis.

Rotary acceleration feed forward
Optimizes operation and performance when the drives are used in vibration-prone,
multi-drive chassis.

NoTouch ramp load technology
The recording head never touches the disk media ensuring significantly less wear to the recording head and media as well as better drive protection in transit.

Environmentally conscious
In addition to being ROHS complaint, this generation of WD VelociRaptor is also
a halogen-free design.

5-year limited warranty


WD VelociRaptor drives devour the competition with unrivaled performance for Gaming and Video Editing.


Credit: www.wdvelociraptor.com

Sunday, February 21, 2010

Cooler Master V10 CPU Cooler

Cooler Master V10 CPU Cooler

Introduction

If one things for sure, there truly seems to be a never-ending supply of new and innovative CPU coolers at our perusal. Just when you think they've thought of everything, something completely different lands on my desk, just waiting to be punished. Luckily, the excitement of pushing the latest releases to the brink of meltdown has yet to leave me.
I have quite often pondered just how heat removal capacity could be harnessed with air-cooling designs. Cooler Master has established a strong and solid presence in the aftermarket cooling world, and having been around for 10+ years, it is not hard to see their highly-focused efforts in providing strong and dependable cooling solutions. From heat sinks and fans to full-featured PC towers, they have something for everyone.
On my desk today is the V10 CPU cooler. With 10 heat pipes, dual fans and a variable TEC plate (Thermoelectric cooling) there is no doubt as to the purpose of this monster: rip as much heat as possible out of your processor. This is Cooler Master's first TEC hybrid design and they have taken a different approach by pairing up this potent technology with air cooling.

Closer Look

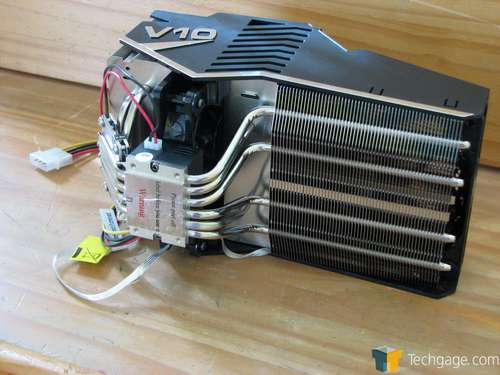
Considering that I was already well-aware of the specifications of the V10, I must admit that the sheer size of it still makes my eyes bulge. Once out of the box, I got my first glimpse of the beast in all its glory. The large full cover shroud grabs your attention with its chrome detailing. This thing is a monster.
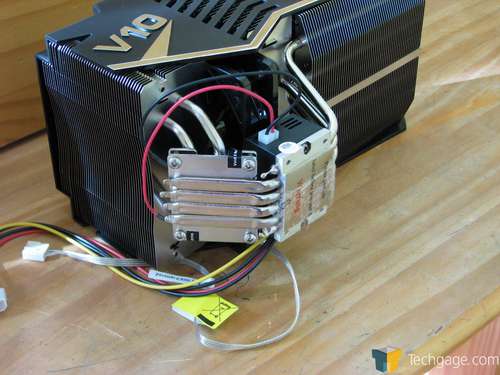
Flipping it around we get a glimpse of the TEC controller and the fan wiring. I really appreciated the fact that the fans are wired together keeping the clutter down to a single 4-pin PWM-capable connector which can find its home directly on your motherboard header. This angle also gives you a better look at the TEC.
Looking down at the top exposes the down-blowing fan which not only blows across 4 of the large heat pipes but also your motherboard. Most if not all motherboard designs place the memory squarely in this area as well as the CPU power circuitry, so the double-duty nature is a nice touch. The fan grill is solid and will protect anything that may try to come in contact with the fan.
Rolling it onto its side we now see the belly of the beast. There is another large surface area section with 2 more heat pipes protruding upwards. A second 120mm fan is ready and waiting to blow across this area and out towards the back of your case. Four of these pipes terminate in the bottom layer of the TEC sandwich. I appreciate the attention to detail and the very good build quality exhibited here.
By adjusting the angle in this next photo you get a better sense of how the heat pipes are oriented. The bends are quite smooth and almost ripple free. The TEC plate gets its power from the control module that resides directly over the CPU contact area.
Moving closer to the front allows us to take a better look at the heart of the V10. The pipes are laminated to the plate on the lower half of the TEC.
Peeling off the protective plastic from the mounting area allows us to check it for flatness and finish. I checked flatness with a metal ruler and found it to be nearly perfect and the finish itself was quite smooth. While it is not a mirror finish by any means I could not feel any imperfections at all. The protective layer did its job very well.
Included hardware was extensive and will allow use on virtually any platform available. The instruction sheets were very thorough. While it would have been nice to get a bit more, you get enough thermal paste to perform a single install.
So with that said, let's see how this beast will fit into our testing machine, and also check out some results, followed by my final thoughts.

CoolIT ECO A.L.C. Liquid CPU Cooler


Introduction

The search for the perfect cooling solution for that new PC you're building never seems to end. Every manufacturer vouches to have the most efficient, quietest and cheapest solution available, and if we merely took their word for it, there would be no need to shop around.
As of late, advertising has reached an unprecedented level with the overwhelming popularity of the Internet and people's ability to research a product down to its very last detail. Some days I almost (and I do mean almost) wish that we were not bombarded with so much information as it does lead to sensory overload causing even the simplest decision to be nearly impossible to make!
Whether you're choosing air or water cooling, there is one simple fact that always comes to the head of the pack: simplicity is a MUST. No one wants to go to be forced to go to engineering school to learn the proper way to install a CPU cooler and they want it to just work straight out of the box with little tinkering. While the enthusiast market is growing day by day with people becoming ever braver to try more difficult installs, there is still only a very small segment of the market willing to put in the effort, and rightfully so.
CoolIT has specialized in PC cooling and has products to cover pretty much any area of the current market. From TEC-based monsters to the venerable all-in-one water cooling solution, CoolIT has been very busy in doing its homework and listening to its customers to make sure it's in tune with what is expected in current products as well as future releases. Having tested its products before I can attest to the fact they do build quality stuff with a strong attention to detail and performance.
Today we get a look at the ECO A.L.C (Advanced Liquid Cooling). There was a time no so long ago that all-in-one solutions were scoffed at without a thought and were nearly ineffective and costly as well. Thankfully, that day is in the past and with releases such as the CoolIT Domino and the very successful Corsair H50 people are forced to take a long hard look at these types of coolers. I have said it many times in the past, water cooling is nearly unsurpassed with its ability to remove tremendous amounts of heat load without falling victim to heat soak. Multi-core processors have the uncanny ability to push their cooling solutions to their limits while overclocking pushes many past the point of failure.
With a simple design, CoolIT is once again setting the stage for another budget water vs. high-end air cooling battle. While we are not directly comparing the ECO to any air solution, we will give you all the facts you need to make the decision as to which way you should go for your next build. When the dust settles, I feel you just may be surprised at the results, so with no further ado, let's get the ECO A.L.C. out of its box and onto a CPU and let parts do the talking.


Closer Look

Shipped in a rather plain and colorless black and white box, the ECO is well packaged and protected in a solid foam clamshell. Just for giggles I even sat down on the box and it held all 200lbs of my weight without feeling like calamity was imminent. Once out of the packaging and onto the table we see that we are given a simple yet elegant cooling solution. The quality is readily apparent and without a doubt you can see the engineers did their homework.
Focusing in on the pump/cup block once again shows off the clean lines and styling. The shroud has the CoolIT logo and part name printed on it and you can also see the simple yet effective thumbscrews used to attach it to the CPU socket. Should you prefer it, the screws are also able to be fastened using a Philips style screw driver.
The radiator is compact and has a solid feel. There is no flex in the metal and the finish is excellent. All of the connections are firm with no play so there is no worry the hoses could come loose once installed inside your case. To me, this is the main appeal of a pre-filled water cooling solution as most people are far too afraid of leaks when contemplating a custom-built water cooling loop.
While we are not given the exact specs of the included fan, I was happy to see it was of the 4-pin PWM style, meaning it will be able to be finely controlled by the motherboard's BIOS as nearly all current motherboards have very effective fan control features built in. This will further enhance the effectiveness while helping maintain quiet levels, should that be within the desired operating parameters.
The base of the High Performance FHE (Fluid Heat Exchanger) has micro channels that help maximize cooling potential. It also sports pre-applied thermal paste so you can skip the often messy step of applying it yourself. Also take note of the simple multi-mount tabs. All you have to do is pull up on the thumbscrew to slide the tabs into the position needed for your socket. I think this innovative design feature is top-notch and far better than shipping multiple brackets for the 3 main Intel sockets.
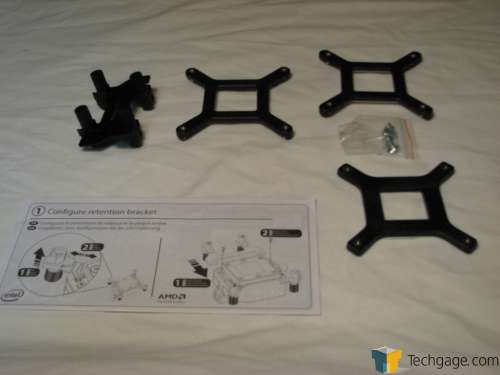
Here we see the rest of the included hardware which comprises the many back plates for the 3 Intel sockets as well as the required mounting tabs for AMD sockets and also the respective back plate. Four screws and a simple installation guide round out the included parts.
I cannot emphasize just how much the simplicity of this design impresses me. While I have built many custom water loops for my personal PC over the years, it was still a daunting task which took days to do properly. This sleek design is sure to be a big hit with the mass market as long as it works as well as it looks.
Now that we have shown you the goods, it's time to get it installed and see just what it's made of.